How to use DSLR Camera Settings
How to use DSLR Camera Settings
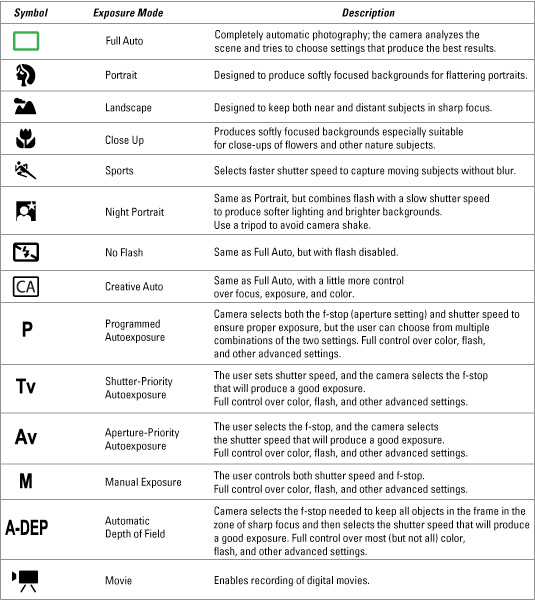
Six automatic settings you will find on your model dials on your DSLR camera:
The following DSLR settings are found on most camera models.
![]() Portrait – Set your digital camera to portrait mode when your taking photographs of people. This mode will set the image color for skin tone perfectly.
Portrait – Set your digital camera to portrait mode when your taking photographs of people. This mode will set the image color for skin tone perfectly.
![]() Landscape – Set your digital camera to Landscape when your taking photos of landscapes.
Landscape – Set your digital camera to Landscape when your taking photos of landscapes.
![]() Close Up – Set your digital camera to Close up mode when you want to photograph small objects.
Close Up – Set your digital camera to Close up mode when you want to photograph small objects.
![]() Sports – Set your digital camera to Sports mode when you want to photograph a moving object such as a child or dog running.
Sports – Set your digital camera to Sports mode when you want to photograph a moving object such as a child or dog running.
![]() Night Portrait – Set your digital camera to Night Portrait mode when you want to shoot a person in low light such as night time.
Night Portrait – Set your digital camera to Night Portrait mode when you want to shoot a person in low light such as night time.
![]() Flash Off – Set your digital camera to Flash Off when your not allowed or don’t want to use a flash.
Flash Off – Set your digital camera to Flash Off when your not allowed or don’t want to use a flash.
Other options in mode dial are: Tv, Av, Auto, P, M, B, A-DEP
Manual DSLR Camera Settings
- ISO – Camera ISO determines how sensitive the image sensor is to light.
- AV mode – AV mode determines whether all the photograph is in focus or part of. For example photographers can choose to have a sharp foreground and background, or they can blur the background.
- Shutter speed – Being the amount of time a digital cameras shutter is held open for when taking a photograph. Shutter speed allows light to reach the cameras image sensor.
- How to properly focus your SLR camera – Is how to focus properly. Using a digital SLR camera will become very frustrating if you don’t understand how to set the focus on the exact object you’re trying to photograph.
- Exposure compensation tips – Many beginners often find their photographs are either underexposed (too dark) or overexposed (too light or white). However, there is a way to manually change the exposure to compensate for them being darker or lighter.
- What is the difference between AV, and A-DEP modes – AV or A-DEP modes, basically do the same thing, in that they allow you to set an aperture so you can control the depth of field seen within a photograph.
- White balance settings – Setting the correct white balance in your digital SLR camera is important to ensure the objects that are white, are actually displayed white within the photograph. Setting an incorrect white balance, can also result in unsightly reds, yellow or green tinges as well, depending on the situation.
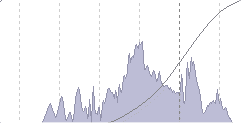
- Histogram – A histogram is a bar chart that shows you whether a photographs exposure is good or bad. You can view the histogram on your camera’s LCD screen after you have taken the shot.
 If you see high peaks on the right side of the histogram, this indicates the photograph may be too bright or overexposed. On the other hand, if there are high peaks on the left side of the histogram, the image is most likely too dark and underexposed. If the peaks are centered like in the example above, the photo is said to be well balanced and exposed.
 - EXIF metadata – EXIF (exchangeable image file) data is a record, showing what digital SLR camera settings were used to take a photograph. This data is recorded into the actual image file. Therefore each photograph has its own unique data. EXIF data stores information like camera model, exposure, aperture, ISO, what camera mode was used and whether or not a flash fired.


